Thursday, September 20, 2012

Ice vs. Heat


Ice vs. Heat
Your game winning spike playing beach volleyball gives you hero status and a sprained ankle because of an awkward landing. Your opponent on the other side of the net isn’t much better off from the knot left on his forehead from the volleyball bouncing off his head. And now that the game’s over, you’re at a crossroads on how to treat your injury: heat or ice?  

The answer is: use ice! Swelling and inflammation is the body’s reaction to common injuries. Nerve impulses and blood flow are working overtime causing additional stress and pressure on your joints and muscles. Your first order of business is to slow this process down, and applying ice does just that. Similar to a local anesthetic, ice works to reduce swelling, numb sore tissues and decrease blood flow. Applying heat does the opposite…ice is the way to go. 

If you have an ice pack…you’re in business. Simply apply to the swollen area: 15 minutes on, 15 minutes off as often as is practical. A bag of frozen veggies works about the same. But to really kick it up a notch, use “wetted ice”, which is a bag containing ice and water. In The Journal of Athletic Training, research has shown “wetted ice” to be far more effective at lowering and maintaining intramuscular temperature. Water acts as a conductor for the coldness of the ice and allows the bag to better conform to the affected area than a rigid ice pack. 

Wrap the bag of “wetted ice” in a towel and apply for the first two days after your injury. After that…you’re ready to switch to heat. This will help get the blood flow going, boost nutrient absorption and get you back on the road to whatever life has to throw at you…including volleyballs.

Thursday, September 6, 2012

What's Wrong With Working Out at Home?

What’s Wrong With Working Out at Home?
Absolutely nothing!!  I’ve heard from many of my clients that they do not enjoy exercising at a gym.  The reasons vary; some find it difficult to carve out ample time to actually go to a gym, between the drive time and the exercise time, it’s just too much for their busy schedule.  Others say they don’t know how to fully utilize the equipment and end up feeling awkward.   And some are too self conscious to work out in front of other people. 
When my son was young my evenings were spent doing laundry, cooking dinner, helping with homework, driving him to and from baseball games and practices and preparing for the next day.   I didn’t see how I could squeeze in gym time.  So during those years I learned how to get a great workout at home with very little equipment.  My arsenal consisted of a jump rope, an exercise ball and a few dumbbells.  And as time went on, I’ve had plenty of years to be creative and create an effective exercise routine that anyone can do at home.
Here are some basic exercises that will get your whole body flowing, increase your strength and give you more endurance.
Knee bends – deep movements that help you tone and strengthen your legs and butt
Push Ups – arm and chest strength…do them on your knees if you’re just starting out.
Burpees – A must for all around body and conditioning
Sit Ups – tighten your core, strengthen your abs
Toe Touches – Increase Flexibility, work your lower back
Grandfather Clock – Reach for the sky, clasp your hands, sway gently left and right as far as you can. Works your obliques and lower back.
Standing Lunges – Take a long stride forward…hold…come back. Now the other leg.
Do these with varying intensity and sets and see your body transform in the comfort of your own home.
If you would like to learn how to work out from the comfort of your home utilizing total body movements with minimal equipment, contact Michelle Turner at FullTilt Fitness Training at 727-418-9127 or email her at michelle.trnr@gmail.com.

Thursday, August 16, 2012

My All Time Favorite Protein Shake Recipe!

After a hard, sweaty, workout....I sincerely enjoy a yummy protein shake.  Today, I want to share with you my ALL TIME FAVORITE protein shake recipe. 

Pull out that blender for starters. 

The ingredients are as follows:
One frozen banana
One full scoop of whey protein (my preference is def whey)
One spoonful of peanut butter (go the natural route...not Jif or Skippy)
Flaxseed oil - read the directions as the amount will depend on your size (typically one tsp per 100 lbs)
Enough POM juice to make it work - enough to keep a decent consistency as it blends....not too watery
Blend it up. Pour into your fave glass.  Enjoy!!!!

JUMP jump JUMP jump!!!!

That's right!!!  Today I want you to JUMP TO IT!!

Get out your jump rope and start jumping.  You will use almost every one of your major muscles by jumping rope.....your shoulders, chest, arms legs and butt. 

Haven't jumped rope in a while?  No prob.  Start out by jumping for 30 seconds.  Give yourself a rest (please, no more than one minute) and jump for another 30 seconds.  Too easy?  Kick it up by jumping for a full 60 seconds with a 20 second rest....another 60 seconds and 20 second rest....one more time....60 seconds and done :)

Go ahead and get crazy.....jump on one foot only.  Jump with both feet.  Cross your arms and jump.  The sky is the limit with this move!! 

What are you waiting for? JUMP jump JUMP!!!!!!

Wednesday, August 15, 2012

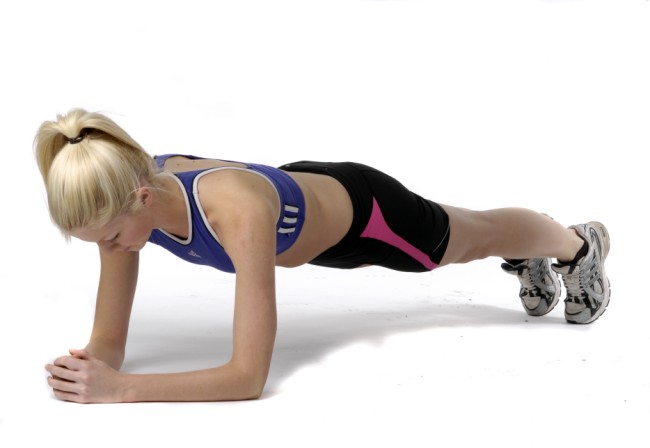
How to do the Plank

This exercise looks deceptively easy, but after holding your body in this position for a few minutes....you will know otherwise. 

There are multiple variations to this exercise...but lets stick to the basics for today. 

To properly perform the Plank exercise you must do the following;
  • elbows must be placed directly beneath your shoulders, weight should be distributed directly between your upper arms, under the elbows (no leaning forward with the weight on your forearms)
  • your feet should be hip-width apart, and you will balance on the balls of your feet
  • legs straight
  • back straight (no sagging or rounding your back)
You should feel your entire body working together to maintain proper form.....not just your abs. 

Hold this position anywhere from 30 seconds to 3 minutes.....then do it 3 more times!  :)  Have fun!!!!


Tuesday, August 14, 2012

POWER SKIPPING!!!!

Yes, I totally yelled that. :)  Why?  Because this is a move I loooooove to incorporate into my workouts.

As a heads up, you will definitely need some space for this exercise. 

READY? SET. GO!!!!

To power skip, you will propel your body forward in a running like fashion.  Start with your left foot on the ground and your right leg bent, knee towards your chest.  As your right leg hits the ground, propel yourself up and forward.....as high as you can go...and bring that left knee up towards your chest.  As I said, it's a running like move (for those of you that never skipped as a kid). 

Easy, breezy....right? Good!!!  Now power skip 20 paces then turn around and do it again.  Let me see you do 3 sets of 20.  Push yourself.  You can do it!!  3 sets and you can still talk with ease?  Excellent!!  Give me 3 more!!!  :)   Enjoy this move and push yourself.  Picture me clapping and cheering you on!  You've got this!!!!

Monday, August 13, 2012

No Excuses

I won't make excuses when I fall short. Instead I will make corrections (thanks to Gym Jones)